In today's post we're going to be offering a variety of suggestions to help ensure that your online photography storefront is setup to be as comfortable and efficient for your visitors as possible. The topics we'll cover are:
- Optimal category usage
- Effective photograph sorting techniques
- Print purchase options
- Print pricing strategies
- Determining shipping prices
Optimal Category Usage
Your clients' images should be presented to them in a way that is clean, organized, and easily navigable. One of the simplest ways to accomplish this is through proper image categorization. Having too many images in any one category, or having too few, will generally result in a smaller number of overall images being viewed and, ultimately, fewer sales.
So what's the magic number? Anywhere from 50-300 images per category seems to be optimal and provides your viewers with the most satisfying experience. This range is fairly loose because it is dependent on the total number of images in each gallery. A couple of good rules of thumb to follow are:
| Total Image Count | Max Images Per Category |
| < 150 Images | 1 - 3 categories, depending on subject matter |
| 150 - 300 | 40% of the total |
| 300 - 750 | 30% of the total |
| 750 - 1500 | 25% of the total, max 250 |
| > 1500 | 20% of the total, max 300 |
If you're having trouble coming up with categories for your galleries, some examples are given below:
- Weddings: Getting Ready, Guests, Bride & Groom, Groom's Family, Bride's Family, Bridesmaids and Groomsmen, Decorations, The Ceremony, The Reception, Brunch, Candids
- Family: Kids, Parents, Family, Playful, Candids
- Seniors: Outfit A, Outfit B, Location A, Location B, Just for Fun, Bloopers
- Sporting Events: 1st Quarter, Defensive Plays, That's Gotta Hurt, Home Team, Jersey #, MVP, Game Changers, Victory
- Ironman/Marathon: Finishing times, Bib number ranges, Swimming, Bicycling, Running, Endurance, Relief, Finish Line
- Boudoir: Favorites, A Little Bit Naughty, Just for Him, Outfit A
- Engagement: Location A, Location B, B&W, Just the Bride, Tender Moments
- Dance: Wallflowers, Show Stoppers, DJ/Band, Guest Arrivals, Dancing, Candids, Photo Booth
Taking an extra 10 minutes per event to organize your images will result in a better experience for your clients, which will ultimately result in additional print sales for you as well.
Effective Photograph Display Techniques
Similar to organizing your photo galleries into categories (as noted above), the images within those categories should also be arranged in a way that encourages exploration and extended viewing times. There are a few ways to do this, including:
- Image Arrangement: Put a handful of your best images at the front of each category, and then organize the rest of your images in a logical sequence. Putting your best images upfront will grab the attention of your viewers and it will encourage them to see what else is inside the category. Once your visitors are inside the category, keep them interested by showing the rest of the images in a way that makes sense. For categories such as Candids there isn't always a "best way" of arranging the images, but for other categories such as Wedding Ceremony the logical sequence will probably be a chronological sequence. In cases such as this, even when multiple shooters are involved, spending a few extra moments to ensure that everything is displayed in the correct sequence will result in a higher photo view-rate and a higher level of satisfaction by your clients.
- Image Rotation: It's amazing how many images we see that are left rotated incorrectly! Don't be someone that does this. Having incorrectly rotated images displays a lack of care for your clients and also shows a lack of attention to detail. Many cameras will automatically rotate your images for you, but if yours doesn't, take the time to rotate your images before (or even after!) uploading them. By itself, this simple step of rotating your images correctly makes a huge difference in the experience your clients have while viewing and purchasing their images.
- Cull Your Images: One of the quickest ways to bore your clients right off of your storefront is to upload and offer all of the images from their session without pruning/culling them first. Quickly go through the images before you upload them, and delete out everything that doesn't have a reason to be there. Is the person blinking? Delete it. Are they making a funny face? Delete it. Is it a little blurry? Delete it. Have you seen the same thing 5 times already in other images? Delete it! You may find yourself deleting 10-20% or more of your images, and that's okay! Get rid of the images that shouldn't be there in the first place, and don't be afraid to present your clients with just your best work.
- Upload sRGB Images: Digital cameras and photo applications such as Photoshop and Lightroom offer the ability to save your images with a variety of different color spaces, but you should always convert your images to sRGB before uploading them to Instaproofs. Why? Because most web browsers have adapted sRGB as their color space and if you upload an image with a different color space (such as AdobeRGB) the browser will convert it to sRGB (and likely do a poor job at it). Additionally, using an sRGB color space will ensure that the colors your clients see on their monitor look most-similar to the finished, printed results.
Print Purchase Options
There are a few different things that we'd like to go over with print purchase options:
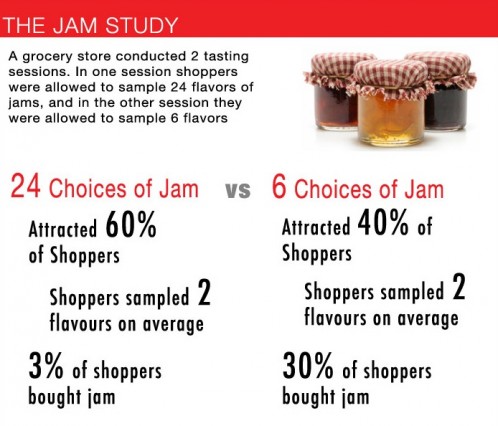
- Limit Sizing Options - With professional labs offering print sizes anywhere from 2x3 to 40x60 (and everywhere in-between!), it may be tempting to offer an extremely large variety of sizes to your clients as well. Don't do it! Lengthy lists of options can quickly clutter up your storefront and overwhelm your visitors. Additionally, multiple studies have shown that offering more than just a few purchase options generally results in significantly fewer sales. Try to limit your options to just 4-6 of the most commonly-purchased print sizes, plus an instant download option or two for good measure. If you have a client that wants a size that isn't offered online, they can use the contact form to get in touch.
- Print Size Sequence - Many photographers naturally list their print sizes from smallest to largest, such as 2x3, 4x6, 5x7, 8x10, etc., but take a few minutes to arrange them a little bit differently and see how it affects your orders! For example, instead of listing your smallest sizes first, list the sizes that you hope to sell the most of first. Or, instead of going from smallest to largest, flip the sequence and start with your larger prints first. A simple change in the option sequence can result in a significant change in your clients' behavior.
- Number of Displayed Options - Through your account preferences you can adjust the number of purchase options that are displayed by default on the purchase page. You can use this setting to your advantage by either (a) displaying all of your available options by default, or (b) limiting the view to display just the couple of sizes that you would like your clients to purchase the most. Your non-displayed sizes are easily viewed and selectable by your clients with the simple click of a button on their end, but by keeping them hidden at first you are directing more of your clients' attention to the options you would like them to purchase.
- Instant Downloads - Your clients are definitely asking for it and if you haven't started offering these yet, you should start offering them immediately. At a minimum, we recommend offering a single low-res download option (for facebook, viewing on mobile devices, etc.). If you have a high-resolution subscription, we also recommend offering a high-resolution instant download option and possibly even a full-event instant download option.
Print Pricing Strategies
There are a LOT of opinions out there regarding the pricing of your images, so we won't add too much to that clutter. Instead, we'll show you a graph that details out how thousand of your fellow-photographers priced their images over the course of the last twelve months.
The graph we are showing below doesn't give you a starting price point, but instead shows you multiplier values for your sizes that can be used after you have determined how much you'd like to charge for a 4x6 print. Determining the price for your 4x6 is up to you, but it should be at least 3x the price your lab charges you for the same print.
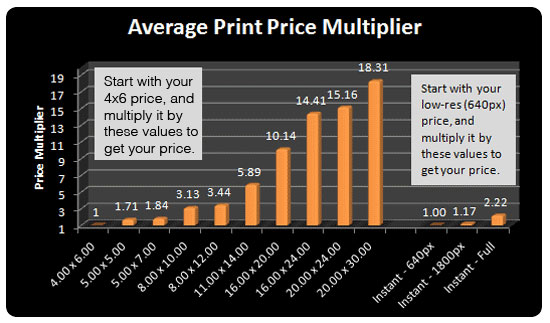
As an example, if we started with a six dollar 4x6 print, the 5x7 multiplier on the graph shows 1.84 which would make the suggested 5x7 price $11.04 ($6 x 1.84 = $11.04).
The multipliers shown on the graph were calculated off of the actual prices for prints sold through Instaproofs during a recent 12 month period.
Two additional observations on print pricing:
- The fastest way to lose a significant volume of your sales is to price your prints too high for your target audience. For example, getting an average middle-income individual to purchase 10 4x6s at $6.29/each is significantly easier than getting the same individual to purchase 3 4x6s at $20 apiece; and your profit would be roughly the same in both scenarios.
- Your target audience and your original client may not always be one and the same for print sales. For example, if you are shooting a wedding for a wealthy couple that might not hesitate to pay $20 for a 4x6 print, that doesn't necessarily mean that their friends and family are going to be able to afford that rate as well. In fact, they probably won't be able to. So when coming up with your pricing strategy, be sure to put some thought into who your target audience for print sales is, rather than who your target audience for your photography services is.
Determining Shipping Prices
Have you ever abandoned an online purchase at the point of checkout simply because the shipping prices were higher than you expected them to be? If you are like the majority of online shoppers, the answer is probably yes. In fact, according to research conducted by BI Intelligence, 58% of US shoppers reported abandoning purchases because "Shipping costs made the total purchase more than expected."
Obviously shipping isn't free and someone has to pay it, but overcharging for it is a fast way to kill a sale! To help you get an idea of what reasonable shipping rates are, we have put together a graph showing the average shipping prices charged for orders placed through all U.S. Instaproofs storefront in the past twelve months.
Are your shipping prices significantly higher than those found in the chart above? If so, you may want to consider revising your rates. You may also want to consider offering free shipping to your clients if your print prices or your minimum order requirements include a buffer large enough to accommodate this. For most people, receiving free shipping encourages more frequent, and often larger, orders.
-------
Now that you've taken the time to read our suggestions, the next step is to implement them! We've seen a lot of people update their storefronts based on the various suggestions we've provided, and we've seen a lot of people increase their sales because of it. We know that you can do it to; good luck!